What You Should Know Before you Buy – A Guide to Buying an Infrared Camera
Paula Bowie, From Uptime Magazine, November 2008 – www.uptimemagazine.com
During Academy of Infrared Training courses, we see many students who have purchased an infrared camera that is not suited for their intended use. These students have put their trust in a camera salesperson, and, many times, that salesperson was solely interested making a sale. Later, these students are disappointed to find out that the camera is not truly suited for their application. This article aims to help the camera buyer understand what basic camera specifications mean, and also help them determine what type of camera and options are suitable for their application. If you note your answers to questions throughout this article, by the end you should have a custom list of applicable specifications and options.
Determining Use…. Key Points to Consider
- Distance from Your Camera to Your Target – If you would normally use the infrared camera at distances of 20 feet or less from the target then most standard lenses are all that is needed to perform inspections. This applies to mechanical and most electrical inspection situations.
However, if you are almost always working at greater distances, such as inspecting power lines or at a power station, you will need a telephoto lens to capture detail. If you are working with IR windows (or “peep holes”) that have been placed on motor control centers or furnaces, or if you are doing outside building or roofing applications, then you may also need a wide-angle lens. A wide-angle lens widens the area being viewed so that you can capture a larger area in one shot.
- Environmental Issues – Working outside presents many special challenges for the thermographer. The sun is a big factor in distorting temperature measurements, and can even make some infrared cameras unusable.
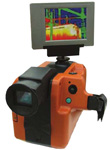
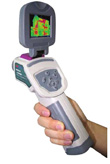
Infrared Cameras come with various viewing options. The most common is the standard eyepiece that goes right up to your eye, and the user looks through it to see the subject. There are also cameras that come with only an LCD screen. If you are mainly working outside, where sun glare is a common occurrence, you may not be able to see the images on your LCD screen. This is similar to what happens when you try to use your computer outside. These cameras often come with a sun-shield, which may or may not work effectively. If you are thinking of buying one of these cameras and you intend to work primarily outdoors, it is important to ask to see the screen and shield in use outside on a sunny day. Make sure that you can see the images clearly. Some cameras come with both options-the eyepiece and an external LCD screen. When you have the option of one or the other, it is better to go with the eyepiece, because you can use this in nearly every environmental situation. The external LCD screen is nice to have when working with a partner, or when working in confined/awkward spaces. Most LCD screens pivot, which allows the operator to hold the entire camera over his head, then pivot the screen so that (s)he can still see the image. In electrical applications you may be required to wear a face shield while doing an inspection, and looking through an eyepiece can be very tricky while wearing a face shield. It is vitally important to consider where and how you are going to use the camera, and then decide which options (eyepiece, LCD or both) you need.
- Ambient Temperature – There are usually two temperature sets given on most infrared camera specification sheets. One set is the maximum and minimum storage temperatures of the camera. Make sure that these storage temperatures fall well within the temperature range in which you will be storing the camera. Remember, the daily temperature ranges in Alaska are very different than those in Arizona.
The other set of temperatures recorded on specification sheets are the normal operating temperatures. These indicate the maximum and minimum temperatures at which the camera can accurately function. If you intend to use the infrared. camera above or below these temperatures, your camera will not work properly. It would not be the first time that a camera has been purchased with the minimum operating temperature listed at -15° C and the environment where the camera was going to be used was regularly at -30°C for a major part of the year. Think about where you will be using the camera, and the temperatures at that location, and then make sure you buy a camera that falls within your operating temperature ranges.
- Temperature of Target – Like operating temperatures, infrared. cameras come with differing abilities to measure high and low temperatures. IR cameras may be used for an extremely hot application like checking refractory thickness at a smelter or a furnace-but can also be used for cold-processing at a dairy. Consider your application, and then check to make sure that the camera can accurately measure within your application’s temperature range.
Most specifications refer to this as the “temperature range” or “temperature measurement capability.” Think about the maximum and minimum temperature that your targets could become, and then insure that these temperatures are well within the camera’s range. Many infrared cameras have the ability to have two or more range settings. just be sure that your required temperatures fall within these range settings and are not an “add-on” option you must purchase.
Taking the Mystery Out of Infrared. Camera Specifications
While looking at various camera specifications, you will notice camera manufacturers use different terminology to express the same concept. To further confuse the issue, manufacturers will also use different units of measure. This is frustrating for the new thermographer. However, by reading this article, and by examining many camera specification sheets, you will become adept at “de-coding” camera specifications. Following are five areas that often feature confusing terminology and units of measure.
Thermal Resolution/Sensitivity – Example: 0.1°C @ 30°C Remember that infrared technology uses variances in temperature to define an image. Simply put, if two objects are the same temperature, when you look through the camera, you will see the two objects as one object. The simplest way to describe thermal resolution is by asking the question, “If you have two objects at different temperatures, how close in temperature can the two objects become, and yet the camera will still measure and ‘see’ these differences?” Thermal resolution or thermal sensitivity is the answer to this question.
Our example specification above shows 0.1°C. This means that the camera can detect temperature differences between two objects which are only 0.1°C apart. An infrared camera with this sensitivity can detect differences between an object which is 50°C and another object which is 50.1°C. The industry standard for measurement is the second half of this equation – “@ 30°C.” This means that when this test was performed, the camera temperature itself was at 30°e. Most camera manufacturers will use the @ 30°C in their specification sheet. Beware, if the “@ 30°C” is not included, then you don’t know at which conditions this camera was tested and you cannot fairly compare this to another camera which has been tested @ 30°C. Think about the temperature of the objects you are going to measure. Are you looking for extremely small changes in temperatures, or larger changes in temperature?
Temperature Resolution/Accuracy – Example: +/- 2°C or 2°6 of reading Temperature resolution or temperature accuracy refers to the level of accuracy of the temperature measurements being recorded by the camera. In this example, +/- 2°C indicates that the recorded temperatures are accurate within 2 degrees C. Therefore, if you get a temperature reading of 50 degrees, the object is actually 48°C – 52°C. When imaging objects at higher temperatures, extreme temperature accuracy may or may not be critical. However, small temperature differences are extremely important in the medical field. Almost all industrial-use camera specification sheets use the +/- 2°C. The “or 2%” part of this equation refers to those objects which are greater than 100°C. For temperatures under 100° C, use the + /- 2°C. For objects greater than 100°C, expect a temperature variance of up to 2%.
Detector Types An infrared camera measures the variances in heat or heat energy to create an image. A regular camera measures the differences in light or light energy to create an image. In an infrared camera, there are a series of highly heat-sensitive detectors or elements inside the camera that pick up and record temperature differences. This information is converted into an image by a small computer inside your camera. The more individual detector elements you have, the clearer the image will be. Just like a computer monitor or digital camera, we sometimes refer to these detector elements as pixels. A camera with a detector array of 320 x 240 means that there are 320 x 240 = 76,800 individual detector elements (or pixels) embedded on the detector array. A camera with 120 x 160 means that there are 19,200 (120 x 160 = 19,200) detector elements embedded on the detector array. Ask yourself, “How much image quality do I actually require?” It may be that the lower resolution is perfectly fine for your applications. Look at your budget and try several cameras of various resolutions to see which will work for your application. Of course, we all would like to drive to work in a jaguar, but we can still get there driving a Taurus! In addition, there are other factors besides the number of pixels which determine the final quality of the image-such as the lens and processor. The only sure-fire way to find out if the image quality is sufficient for you is to try the camera for yourself. Caution: some camera specification sheets will say 320 x 240, but if you look carefully, you will see that what they are referring to is the resolution of the LCD display, not the number of detector elements inside the camera.
Other Options
Digital Camera Today many infrared cameras come with an optional digital camera incorporated in their housing. The main advantages of the digital camera are: the digital image will be taken at nearly the same angle as the IR image, and only one piece of equipment needs to be carried around for inspection. This feature is mainly used in the case of formal infrared inspection reports. Formal reports require both an infrared image and a color digital picture to be used side-by-side. The digital camera feature is helpful, and recommended. It is often difficult to make sense of the object by looking solely at the infrared image. The color picture helps with analysis and also helps the repair person to pinpoint the location and type of equipment that the report describes. However, the digital camera component may be of such poor quality that the pictures are rendered unusable-especially at far distances and in low-light situations. Recently, some camera manufacturers have begun including a small light beacon or torch that you can use to provide better illumination when taking the digital image. This does improve the quality of the images somewhat. Again, test the quality of the digital image for yourself. Using the infrared camera, take a digital picture in low light and/or at a distance, incorporate it into a report and then print it. Is the digital image of the quality that you require?
The other drawback of the incorporated digital camera is that this is one more component that can fail, requiring a repair and the accompanying delays. You likely need digital images of each anomaly found, but do you want this as a camera option? Make sure the quality of the digital pictures is high enough to justify the added expense.
External Display As discussed previously, determine whether you need an eyepiece only, an LCD screen only, or both.
Laser Pointer This feature helps in locating an anomaly. For example, it can be helpful to point out the exact circuit you are looking for. Be aware that sometimes you must mentally adjust for the discrepancy between the laser pointer and lens locations. Try the laser pointer feature to see how it works before being sold on this feature.
Voice recording This handy option allows you to record a voice description at the same time that you take your image. You may record location identifiers or any other details.
Annotations If voice recording is not an option the camera may have an annotation option. Usually this is a scroll down list on the camera that allows you to select descriptors and attach them to your image. For example, you may have “MCC,” “BUS,” “Bearing,” or “Ceiling” as options on your pull- down list. You may also have the option to add custom annotations to the list as well.
Video This feature is useful for capturing temperature changes over time.
Memory Ability Many cameras come with a memory card for image storage. Later, you can remove the memory card and then load the images onto your computer using a memory card reader. However, some cameras have internal memory, requiring that you plug the camera into your computer to download images. The advantage of a memory card system is its expandability. Simply pop in a new memory card when the one you are using is full. If you are thinking about buying a camera with internal memory only, find out how many images can be stored before you have to download them. Do you have enough space for images to make it through a typical inspection round?
Battery Type and Life Some camera companies use proprietary (that is, their own custom brand of) rechargeable batteries. Other companies use a generic rechargeable battery that you can replace at any electronics store. Usually the proprietary battery is more expensive , and harder to get. Find out how many batteries are supplied with the camera purchase, and the company’s estimate of “battery life” (how many hours of use each battery has before recharging is needed.)
Software To manage image storage, organization, sharing, and for report creation, you’ll need infrared camera software installed on your computer. Each camera manufacturer creates their own (again, “proprietary”) software programs that allow you to store, view and manipulate the images on your computer. These software programs are not interchangeable. You need to have the program for your specific brand of camera. Some camera manufacturers incorporate the cost of the software into the price of the camera, whereas other companies price the software as a separate component. When comparing camera package prices, find out if the software is included. Without the software, you are extremely limited as to what you can do with the information you gather. Be cautioned that some companies also create “viewing software” which only allows the user to view the images on a computer, but does not allow manipulation of images for analysis, nor report creation. If you need to create reports, insure that you have the reporting software. Basic reporting software should have the following functions:
- It should allow you to control the location of your saved images.
- It should have report templates, but also allow you to create a custom report.
- It should have numerous measurement tools, tables and graphs.
- It should allow you to import IR and full -color digital images into the report.
Make sure that you see a demonstration of the software, and then be given at least an hour to experiment with the software. Many companies have trial downloads of their software, so take advantage of this. Most software is intuitive and looks and functions similarly to Microsoft Windows programs. Other programs are more complex. Think about who will be using the reporting software, the level of computer skill and ability that person possesses. Is s/he a motivated learner and able to self-teach? If it is more likely that people with limited computer skills will be using this program, then you may consider purchasing a camera with simpler software. If you use several different technologies within a maintenance program, you may already have integration software that combines various technologies. If so, find out which camera manufacturer produces software that is compatible with your integration program.
Conclusion
Now that we have gone through infrared camera features, specifications and explained some potential pitfalls, you should have, or be able to compile, a list of specifications/options that you require for your particular application. Before making the big commitment to buying your camera, take the following steps:
- Organize your list in order of priorities or divide the list into “must have” and “preferred” lists.
- Determine your budget.
- Ask for camera demonstrations, and make sure the salesperson goes through each function.
- Make sure all your questions are clearly answered. Take notes!
- Review the camera and software manuals- are they easy to use?
- MOST IMPORTANT-Try the camera and software before you buy.
Don’t BE SOLD-instead, buy the infrared camera that is right for the user and your company’s needs!
Related Articles
Principles of Insulation Testing
Top Tips for Selecting Pressure Measurement Transmitters
Gearbox Diagnostics Fault Detection
What is Vibration?
Why Record? Infrared Video